My first impressions of Cilium
What Cilium is?

Introduction
This year was my first visit to KubeCon in Valencia which was great and I had the opportunity to learn about many new technologies. I was happy to be able to know about (for me) a new approach to Kubernetes CNI called Cilium. So, let’s find out together what Cilium is.
Cilium is an open source software for providing, securing and observing network connectivity between container workloads — cloud native, and fueled by the revolutionary Kernel technology eBPF.
In order to understand how Cilium works, we need to know about eBPF which is relied on BPF (Berkeley Packet Filter) old but gold technology that was released in 1992. eBFP is an extended version of the BPF packet filtering (JIT) mechanism that the Linux kernel provides us (which has been introduced in Linux kernel version 3.15). Briefly, eBPF allows you to run code from userspace in the kernel and allow sharing of data between eBPF kernel programs and between kernel and user-space applications without any kernel source modification. Sounds great.
If you are more interested in eBPF, I would recommend “What is eBPF?” titled book written by Liz Rice (Chief Open Source Officer at Isovalent). Besides, I am glad to have the opportunity to attend her lectures in Valencia.
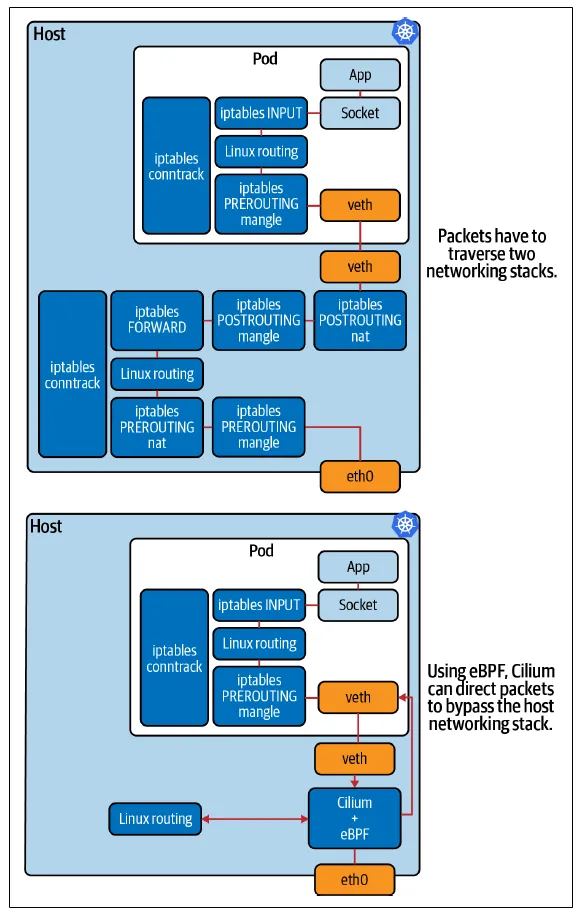
Hence we need an eBPF program that takes advantage of its benefits and here comes Cilium into the picture. Cilium is an eBPF program that enables the dynamic insertion of network security visibility and control logic within the Linux kernel. Why is this good for us? Because Cilium significantly simplifies routing when it can direct packages to bypass the host networking stack so that it realizes measurable performance improvements.

Additional features in the Kubernetes cluster:
- Egress support to external services
- Enhanced Networkpolicy support by providing CRDs (Custom Resource Definition). CiliumNetworkPolicy CRD enables to create L7 policy enforcement for both ingress and egress for HTTP protocol.
- Load Balancing by using ClusterIP implementation.
- Hubble component of Cilium is an observability tool with both a command line interface and UI that focuses on network flows in your Kubernetes clusters.
- Tetragon component of Cilium offers another powerful approach, using eBPF to monitor the four golden signals of container security observability: process execution, network sockets, file access, and layer 7 network identity.
Tutorial
In this tutorial, I used an on-prem preinstalled Kubernetes cluster with 3 master and 3 worker nodes without CNI. This will be our starting point.
Prerequisites
- Up and running Kubernetes cluster
- Installed Helm 3 (Helm 2 is no longer supported)
- Installation
Install Cilium CLI tool
curl -L --remote-name-all https://github.com/cilium/cilium-cli/releases/latest/download/cilium-linux-amd64.tar.gz{,.sha256sum}
sha256sum --check cilium-linux-amd64.tar.gz.sha256sum
sudo tar xzvfC cilium-linux-amd64.tar.gz /usr/local/bin
rm cilium-linux-amd64.tar.gz{,.sha256sum}

# cilium version
cilium-cli: v0.10.7 compiled with go1.18.1 on linux/amd64
cilium image (default): v1.10.11
cilium image (stable): v1.11.6
cilium image (running): v1.9.16- Adding Cilium Helm repo
helm repo add cilium https://helm.cilium.io/- Install Cilium with Hubble by Helm values (Additionally set up IPAM mode, Pod IPv4 CIDR, and pool size)
helm install cilium cilium/cilium — version 1.9.16 \
 — namespace kube-system \
 — set ipam.mode=cluster-pool \
 — set hubble.relay.enabled=true \
 — set hubble.enabled=true \
 — set h
 ubble.ui.enabled=true \
 — set ipam.operator.clusterPoolIPv4PodCIDR=192.168.0.0/16 \
— set ipam.operator.clusterPoolIPv4MaskSize=24- Check Cilium status
cilium status
    /¯¯\
 /¯¯\__/¯¯\    Cilium:         OK
 \__/¯¯\__/    Operator:       OK
 /¯¯\__/¯¯\    Hubble:         OK
 \__/¯¯\__/    ClusterMesh:    disabled
    \__/
DaemonSet         cilium             Desired: 6, Ready: 6/6, Available: 6/6
Deployment        cilium-operator    Desired: 2, Ready: 2/2, Available: 2/2
Deployment        hubble-relay       Desired: 1, Ready: 1/1, Available: 1/1
Deployment        hubble-ui          Desired: 1, Ready: 1/1, Available: 1/1
Containers:       hubble-relay       Running: 1
                  hubble-ui          Running: 1
                  cilium             Running: 6
                  cilium-operator    Running: 2
Cluster Pods:     18/20 managed by Cilium
Image versions    cilium             quay.io/cilium/cilium:v1.9.16: 6
                  cilium-operator    quay.io/cilium/operator-generic:v1.9.16: 2
                  hubble-relay       quay.io/cilium/hubble-relay:v1.9.16: 1
                  hubble-ui          quay.io/cilium/hubble-ui:v0.8.5@sha256:4eaca1ec1741043cfba6066a165b3bf251590cf4ac66371c4f63fbed2224ebb4: 1
                  hubble-ui          quay.io/cilium/hubble-ui-backend:v0.8.5@sha256:2bce50cf6c32719d072706f7ceccad654bfa907b2745a496da99610776fe31ed: 1
hubble-ui docker.io/envoyproxy/envoy:v1.18.4@sha256:e5c2bb2870d0e59ce917a5100311813b4ede96ce4eb0c6bfa879e3fbe3e83935: 1- And you can run a connectivity test as well to be sure everything is fine.
cilium connectivity testConclusion
In this tutorial, I installed Cilium CNI on an existing on-prem Kubernetes cluster. Fortunately, it was smooth and everything worked the first time. It seems extraordinary and cutting-edge CNI and I am curious and I am planning to dig deep down into it in the next part.

