
· 8 min read
Checkov - the DevOps detective
Meet Checkov — the detective of the DevOps world!

Introduction
Security is an increasingly important factor in the development of modern cloud infrastructure. While the Infrastructure as Code (IaC) approach has many advantages, it also carries security risks. Configuration verification can be automated with Checkov.
What is Checkov?
Checkov is an open-source, Python-based static code analysis tool that helps you identify and prevent security flaws at the development stage. It contains more than 1000 predefined security and compliance rules. It can also analyze Terraform (and Terragrunt) configurations, CloudFormation templates, Kubernetes YAML files, Docker files and Helm charts.
How does Checkov work?
The way Checkov works can be broken down into three simple steps.
File scanning and analysis
Checkov performs static code analysis, which means that it reads the configuration files, but does not run or install them. The tool automatically detects different formats such as Terraform, Kubernetes YAML or Dockerfile files. It then processes the code structure and understands the relationships between resources.
Application of security rules
It assigns the appropriate security rules to each resource and checks that the configuration is in line with best practices. For example, for an S3 bucket, it checks if logging is enabled, version control is enabled, encryption is active, or replication is working.
Summary of results
At the end of the scan, it generates a detailed report showing which settings were passed (PASSED), which contained a security flaw (FAILED), which checks were skipped (SKIPPED), and which cases were not meaningful (UNKNOWN).
How to use it?
As an example, let us consider a simple Terraform-based infrastructure that we intend to create in AWS:
# Terraform module directory structure
.
└── vpc
    ├── main.tf
    ├── outputs.tf
    ├── providers.tf
    └── variables.tf
Before running the terraform plan/terraform apply command, we can use Checkov to see what mistakes we have made and what security best practices we have missed. To do this, first we need to install it using pip:
pip install checkovCheckov can accept as input a folder, files, or the .json files generated as the output of terraform plan:
# Configure a folder
checkov --directory /vpc

# Configure a file or files
checkov -f /vpc/main.tf -f /vpc/providers.tf
After running the check, output similar to this will be displayed:
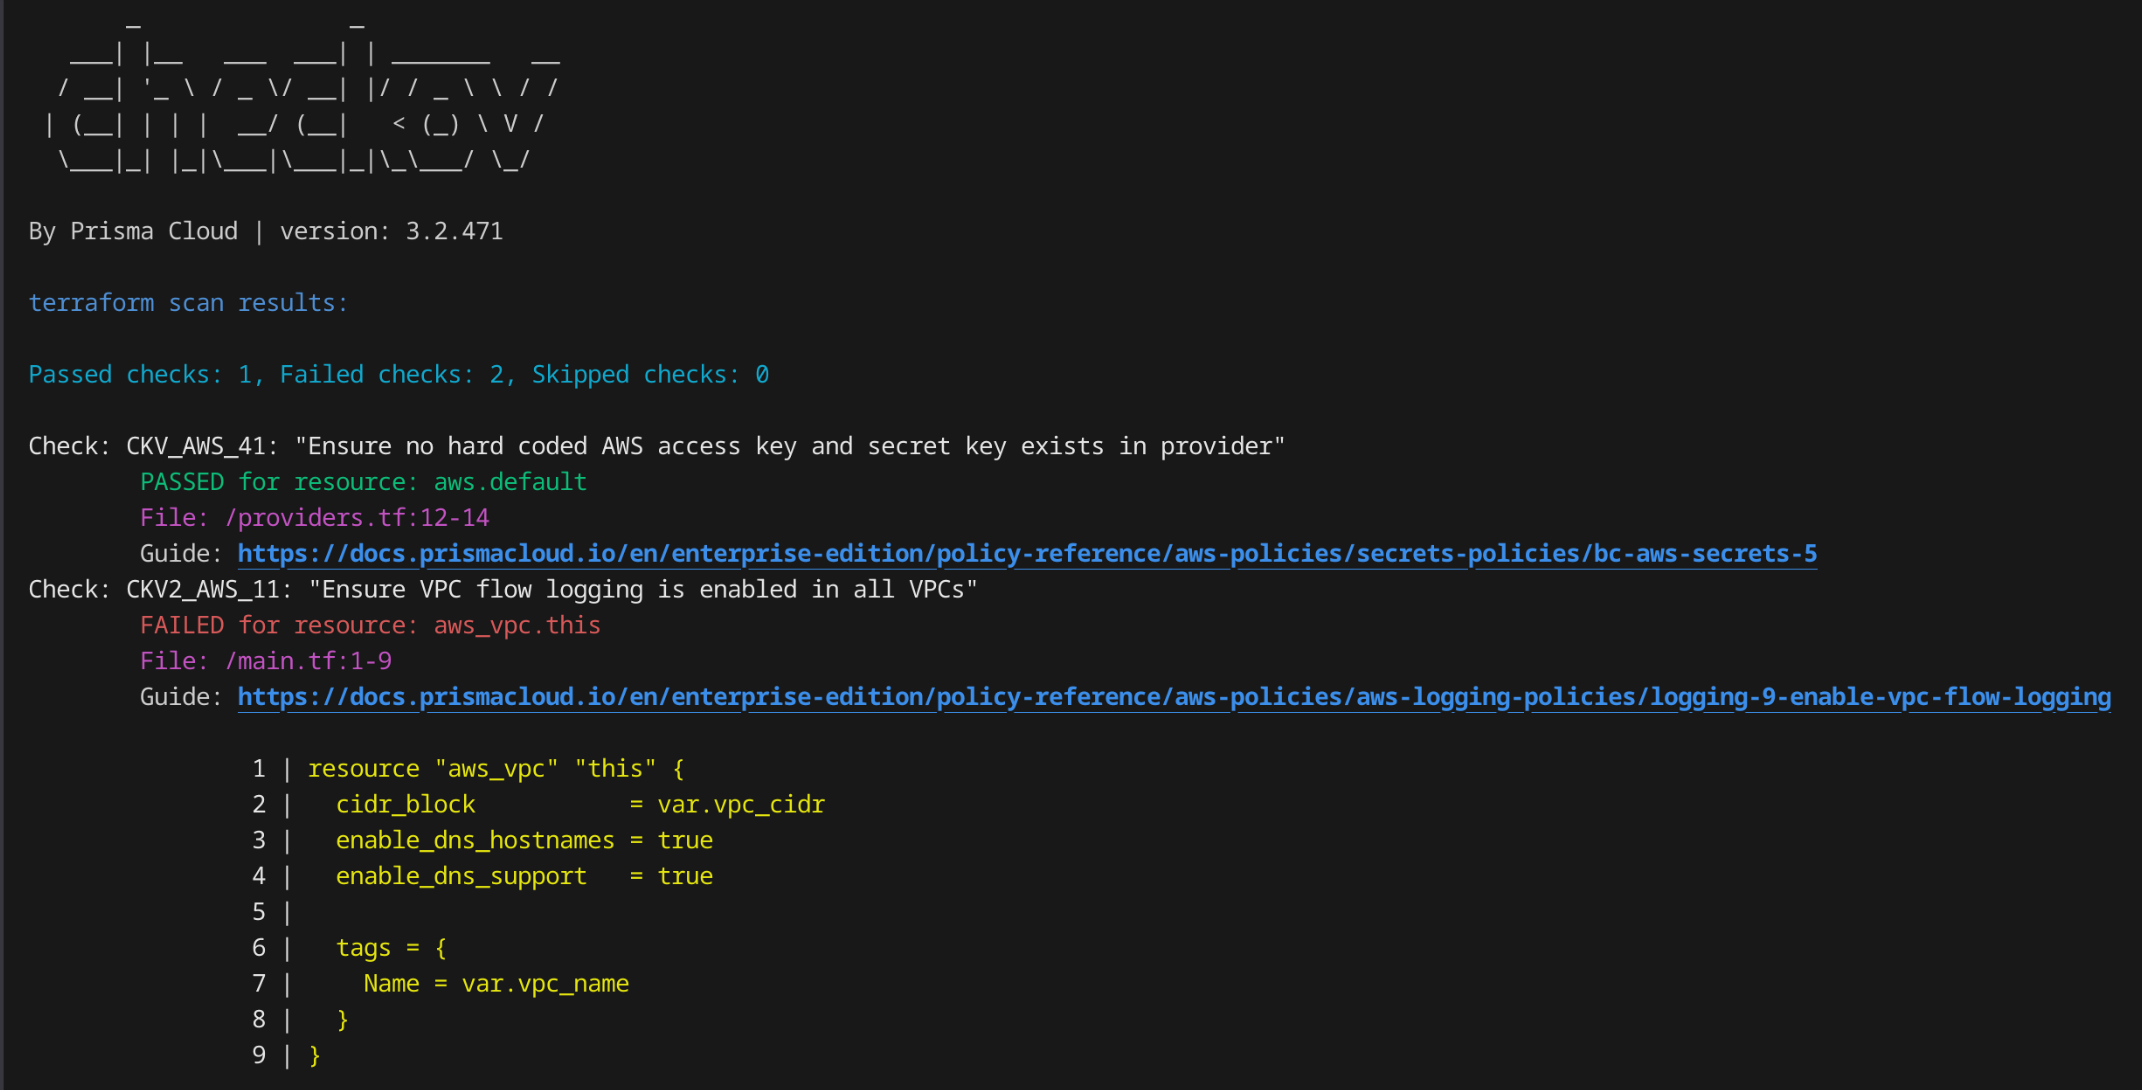
Checkov checks all resources and returns one of the following outputs:
PASSED → meets the rule
FAILED → not compliant, needs correction (e.g. VPC Flow Logs missing)
SKIPPED → intentional omission with
--skip-checkorcheckov:skipcomment (e.g.checkov -d vpc/ --skip-check CKV_AWS_20)
Terragrunt compatibility
At Code Factory we use Terragrunt in our Infrastructure as Code projects. Since Checkov by default recognizes .tf files, it does not always handle the .hcl files used by Terragrunt properly. The common practice therefore is to first generate a Terraform plan with Terragrunt, then convert it into JSON format and run Checkov on it:
# Configuring Terraform Plan in JSON format
terraform init
terraform plan -out tf.plan
terraform show -json tf.plan  > tf.json
checkov -f tf.json
This avoids the direct interpretation of .hcl files and provides a single, supported input to Checkov. The method is fully compatible with Terragrunt based projects and uses the same rules as in traditional Terraform workflows.
Custom Policies
One of Checkov’s greatest strengths is that you can not only use the built-in rules, but also write your own completely custom checks. These are called custom policies, and are designed to automatically enforce your organisation’s internal policies, such as requirements for members, naming conventions or security settings.
Custom rules are created in YAML format. You need to specify the rule identifier (or index) Custom rules are created in YAML format. You need to specify the rule identifier (or index), name, category, severity, and define which resource type, attribute, and expected value to check. To run the rules, use the --external-checks-dir parameter to specify the directory containing your custom rules. Your custom checks will then run alongside Checkov’s built-in rules., name, category, severity, and define which resource type, attribute, and expected value to check. To run the rules, use the ‘—external-checks-dir’ parameter to specify the directory containing your custom rules. Your custom checks will then run alongside Checkov’s built-in rules.
- Custom Policy Example:
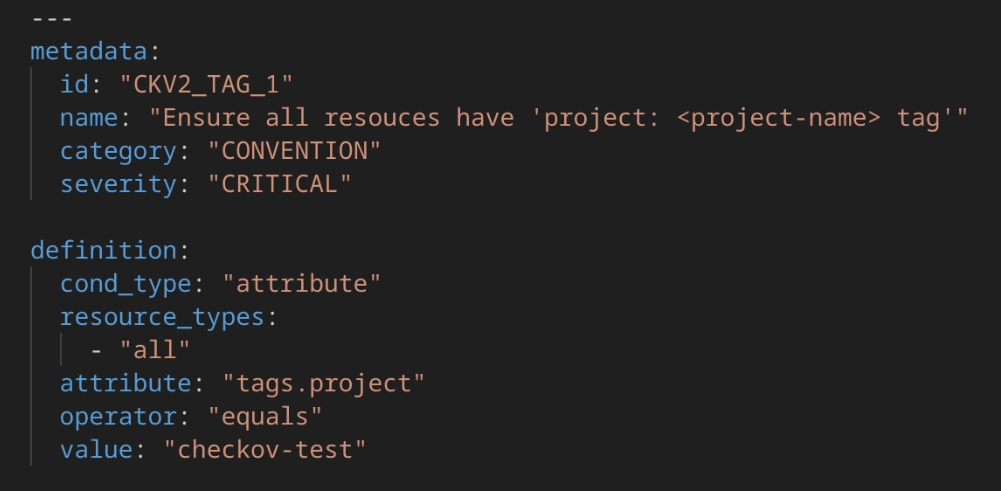
The first specific rule defines a general tagging requirement: each resource must have a ‘project: checkov-test’ tag. The rule applies to all resource types and checks that the value of the ‘tags.project’ attribute is exactly ‘checkov-test’. This approach ensures consistent project identification across the infrastructure, facilitating resource management and cost tracking at the organisational level.
- Custom Policy Example:

The second custom rule specifically applies to AWS VPC subnets and checks the configuration required for the operation of the EKS (Elastic Kubernetes Service) internal load balancer. The rule requires that ‘aws_subnet’ resources include the ‘kubernetes.io/role/internal-elb’ tag with a value of ‘1’.
This tag is essential in Kubernetes environments, as the AWS Load Balancer Controller uses it to identify subnets that can be used for internal load balancers. Without it, EKS would not be able to correctly select the appropriate subnets to provide an internal load balancer.
Policy Indices
For identifying custom rules, Checkov uses so-called policy indexes, which are specified in the ‘metadata.id’ field.
These unique identifiers ensure that the rules can be clearly referenced and tracked in reports or CI/CD processes.
The convention for rule identifiers can be freely chosen, but it is advisable to apply a consistent pattern (for example, using prefixes for specific rule groups) so that it remains easy to identify which organizational policy a given check belongs to.
In the examples above, the ‘CKV2_TAG_1’ and ‘CKV2_TAG_2’ indexes indicate that the checks are related to tags, making the purpose of the policies clear even from the identifier itself.
Severity
Checkov’s severity level system distinguishes four categories: CRITICAL, HIGH, MEDIUM and LOW which allow rules to be organized hierarchically by importance. These levels become particularly relevant in the operation of the soft fail and hard fail mechanisms.
In the case of a soft fail, Checkov displays warnings about failed checks but does not interrupt execution or return a non-zero exit code, thus allowing the deployment process to continue.
At hard fail, on the other hand, stops execution and returns a non-zero exit code, preventing further steps from being executed in the CI/CD pipeline.
checkov -f tf.json --soft-fail-on LOW

checkov -f tf.json --hard-fail-on MEDIUM
With the --soft-fail and --soft-fail-on parameters, it is possible to fine-tune which severity levels trigger soft fail behavior, while the --hard-fail-on parameter allows specifying the levels that should result in a hard fail.
This flexibility enables a gradual policy rollout, where initially only warnings are displayed, and stricter enforcement can be applied later.
Integrating Checkov into CI/CD pipeline
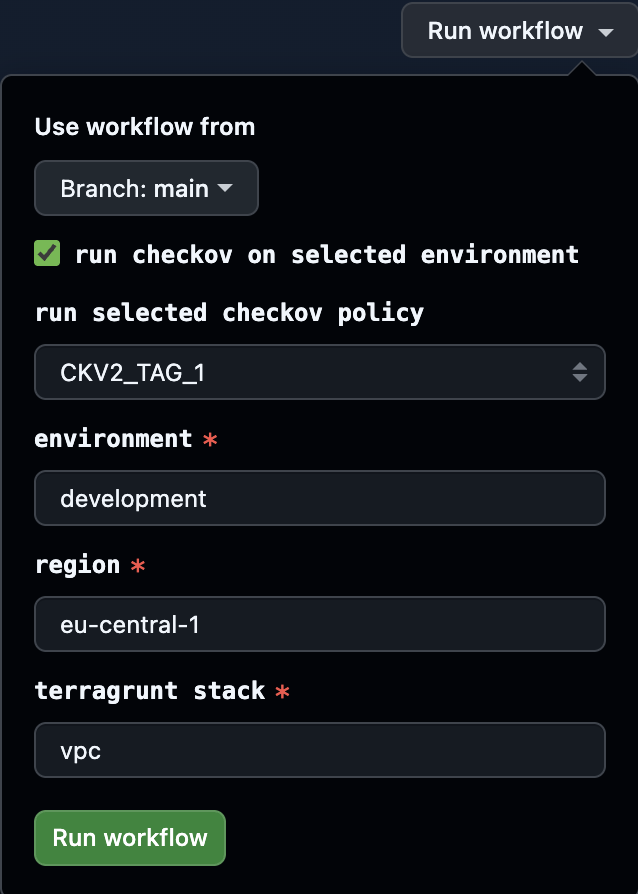
The custom rules presented above have also been integrated into the development process by incorporating them into the Checkov GitHub Actions workflow. This allows our Terraform/Terragrunt plans to be automatically checked by the pipeline according to both built-in and custom rules.
The workflow provides flexible input parameters: it is possible to specify that only a particular environment should be checked, to run all plans at once, or to enforce only a specific custom policy (for example, the ‘CKV2_TAG_1’ or ‘CKV2_TAG_2’ rule).
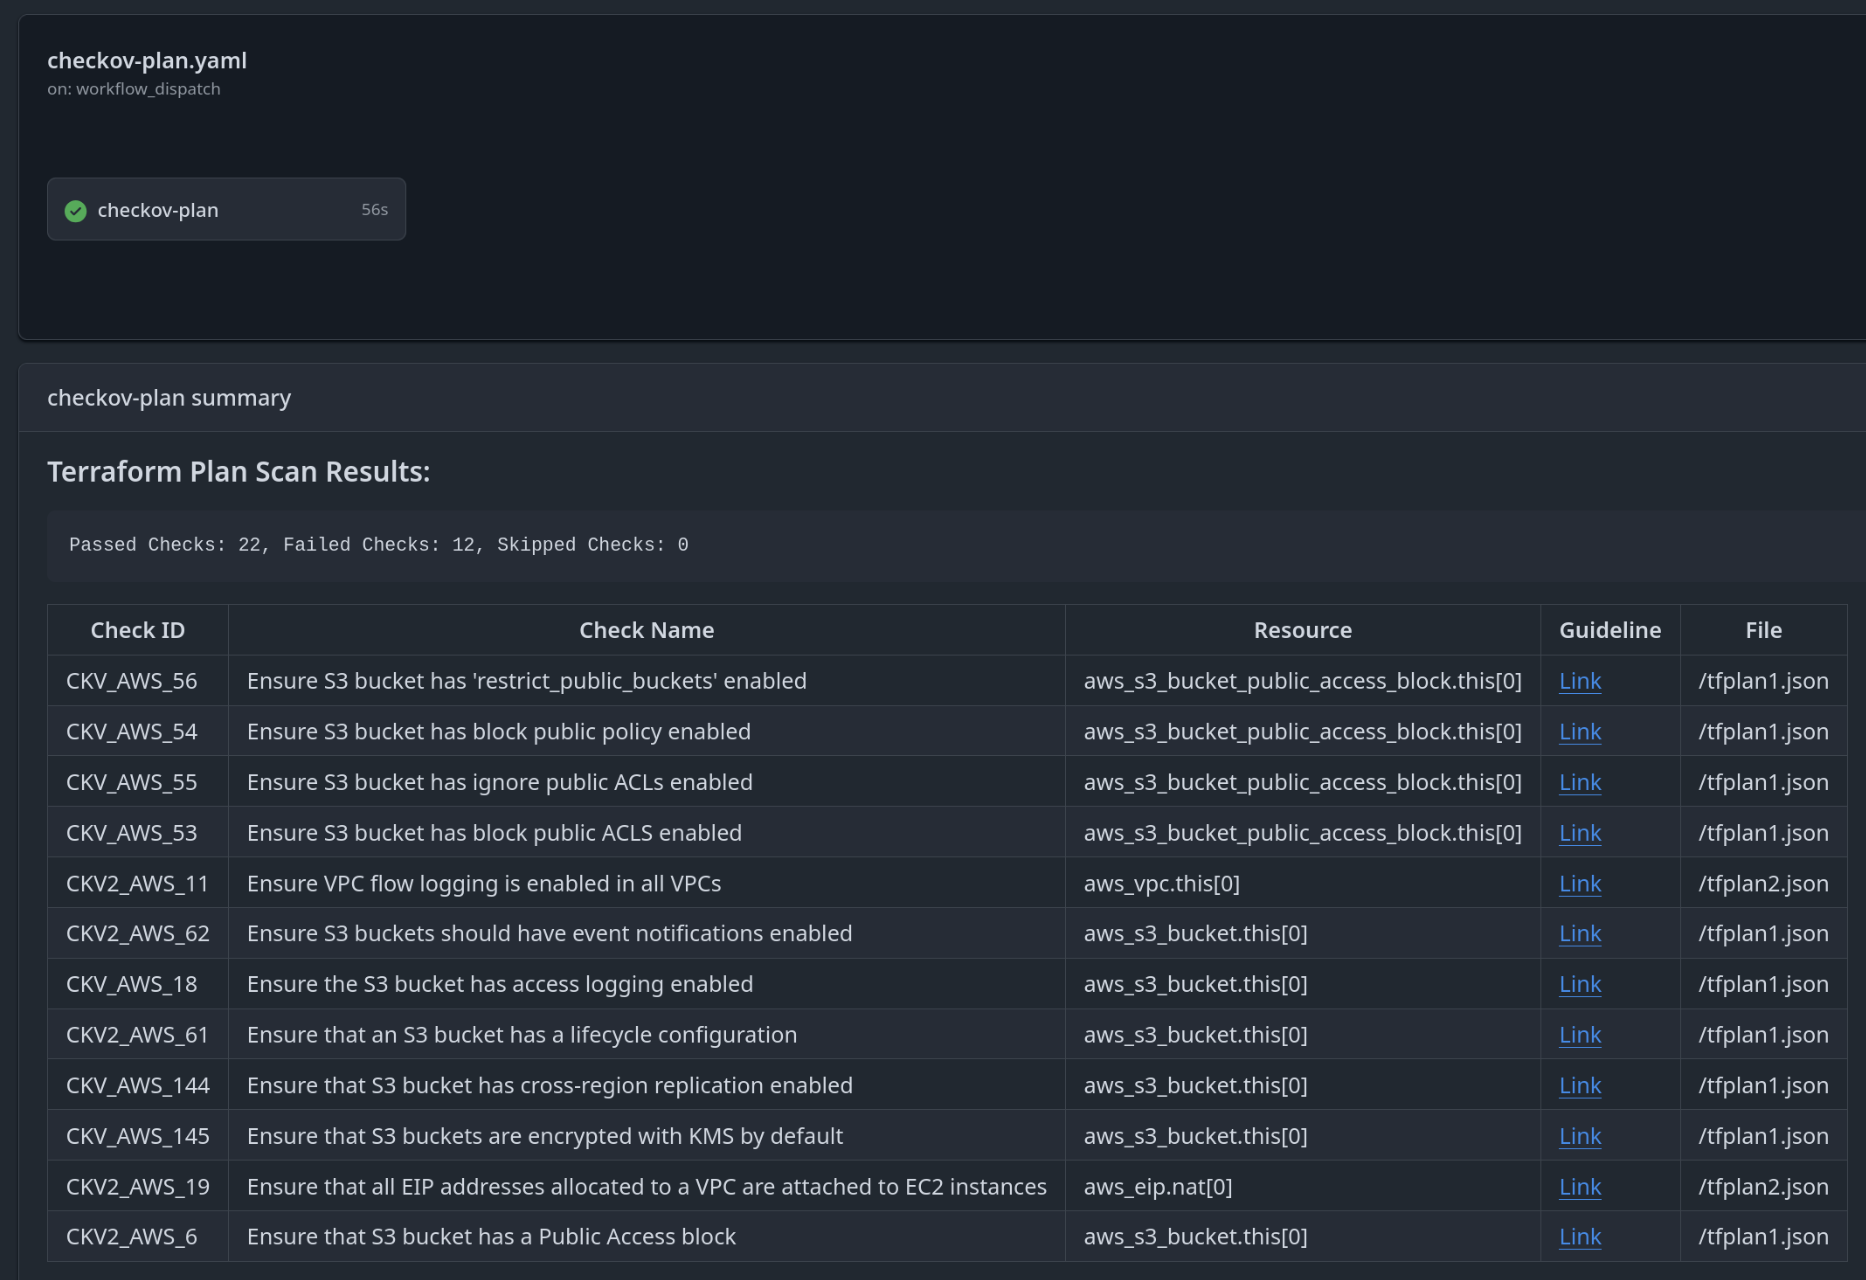
The process converts the Terraform/Terragrunt plan to JSON format and runs Checkov analysis on it. Results are displayed in a table format in the GitHub Actions summary, with failed checks clearly separated. Each issue includes a remediation link directly accessible from the summary. Since checks default to soft fail mode, the pipeline continues running, enabling gradual rollout of custom rules across your infrastructure codebase.
Summary
In practical application, Checkov proves to be a genuinely useful tool for infrastructure security checks. Its biggest advantage is ease of use and the ability to introduce it gradually without disrupting existing workflows.
Writing custom rules is straightforward, and severity levels help prioritize issues effectively. Checks run in seconds and work completely offline, so they don’t affect production environments and integrate easily into CI/CD pipelines.
The key benefit is catching security issues before they appear in actual infrastructure. The tool’s limitations include potentially longer check times in complex multi-cloud environments and occasional false positives with complicated infrastructure code. However, Checkov is well-documented with detailed examples and explanations, making it easy to implement quickly and smoothly in projects.
The application provides significant benefits in improving code quality and reducing security issues reaching production.
Using Checkov is more than a technical decision - it’s a shift toward a “security as code” mindset. The tool helps ensure security isn’t just an afterthought but is considered during development. Custom rules combined with GitHub Actions integration allow every organization to automate security checks according to their own standards while maintaining development velocity. As more infrastructure moves to code, using tools like this will likely become essential for modern development teams.
Thank you for reading this article!
Are you interested in this topic? Do you have any questions about the article? Book a free consultation and let’s see how the Code Factory team can help you, or take a look at our services!