
László Vargha
· 5 min read
Bun + AWS Lambda = ❤️
A step-by-step walk-through to publish a Bun lambda layer with an example TypeScript handler code on AWS Lambda.
(9+1 steps to deploy your Bun app to AWS Lambda)
Overview
This guide will provide a step-by-step walk-through to publish a Bun lambda layer with an example TypeScript handler code on AWS Lambda. By the end of this guide you will be able to call your lambda function externally via an URL.
Bun has taken over the internet because of its features and performance. Bun is not just a runtime like NodeJS, Bun is a:
Why Bun?
At Code Factory Hungary we are devoted to search for new concepts and technologies to provide an up-to-date and optimal solution for our customers. Bun is a new alternative for Node.js with a focus on fast startup, efficient code execution, and a cohesive developer experience. It also provides a package for AWS Lambda, and my task was to create a working and easy to use proof of concept.
This guide will provide a step-by-step walk-through to publish a Bun lambda layer with an example TypeScript handler code on AWS Lambda. By the end of this guide you will be able to call your lambda function externally via an URL.
Bun is under active development and may receive major changes that affects its functioning. This method has been tested with version 1.0.1
Requirements
- Bun installed on your machine
- Have an AWS account
- Have AWS CLI set up
Step 1 — Clone the Bun git repository
First we need to clone the Bun repository to our machine and enter into the bun-lambda package.
git clone git@github.com:oven-sh/bun.git
cd bun/packages/bun-lambda
Step 2 — Install the required packages
In the bun-lambda dictionary we have to install Bun’s packages.
bun install
bun install @oclif/plugin-plugins
Both install commands are required currently.
Step 3 — Build the Lambda layer (optional)
This step is only necessary if you want to upload the lambda layer using the AWS console. If you will use the terminal you can skip this step as the next step will also build the .zip file before uploading.
Now we can build a .zip file that contains the runtime and bootstrap files for the lambda layer.
bun run build-layer --      \
  --arch aarch64            \
  --release latest          \
  --output ./bun-lambda.zip
Step 4 — Publish the Lambda layer
To publish the layer on AWS lambda we need to have the AWS CLI configured.
bun run publish-layer --      \
  --layer bun-layer           \
  --arch aarch64              \
  --release latest            \
  --output ./bun-lambda.zip   \
  --region eu-west-2
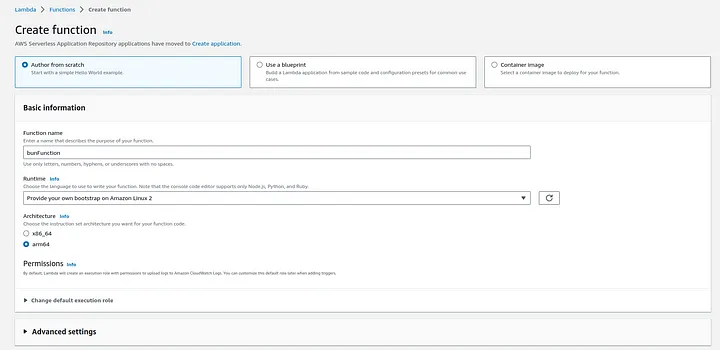
Step 5 — Create a Lambda function on AWS
- Go to AWS Lambda console and click on Create function
- Select Author from scratch and name your function as you want
- Select Provide your own bootstrap on Amazon Linux 2 from Custom runtime
- Select arm64 as Architecture
- Now click on Create function button.
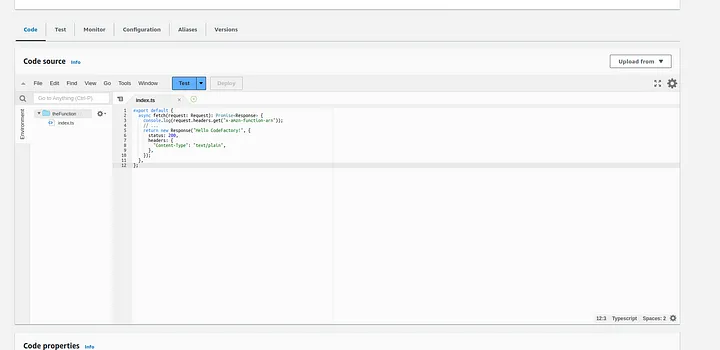
Step 6 — Write a handler for your Lambda function
Now we need to write the function that handles requests.
- Go to the Code source and create a new file with the name “index.ts”
- Paste the code below where we are just returning “Hello CodeFactory” with status 200 and logging the function arn header to CloudWatch
- Click on Deploy to deploy the changes.
export default {
async fetch(request: Request): Promise<Response> {
console.log(request.headers.get("x-amzn-function-arn"));
// ...
return new Response("Hello CodeFactory", {
status: 200,
headers: {
"Content-Type": "text/plain",
},
});
},
};
Step 7 — Update function handler
- Scroll down to Runtime settings and click on Edit.
- Update the Handler option with index.fetch
- index is the name of our file.
- fetch is the name of function we want Bun to call.
- Click on Save.
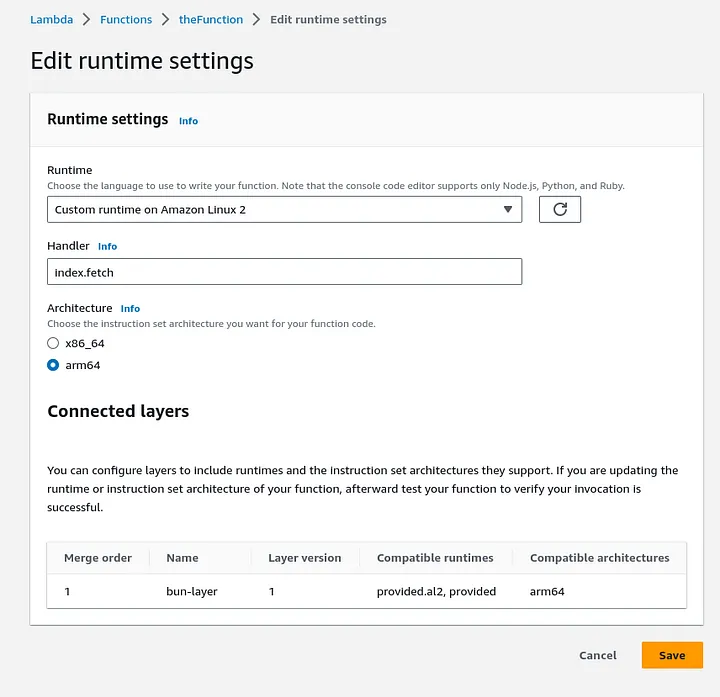
If you are doing it for the first time you will not see any connected layers.
Step 8 — Attach Bun Lambda layer to the Function
- Scroll down to Layers and click on Add a layer.
- Select Custom layers
- From the drop-down menu select bun-layer
- Select the version you want to use
- Click Add
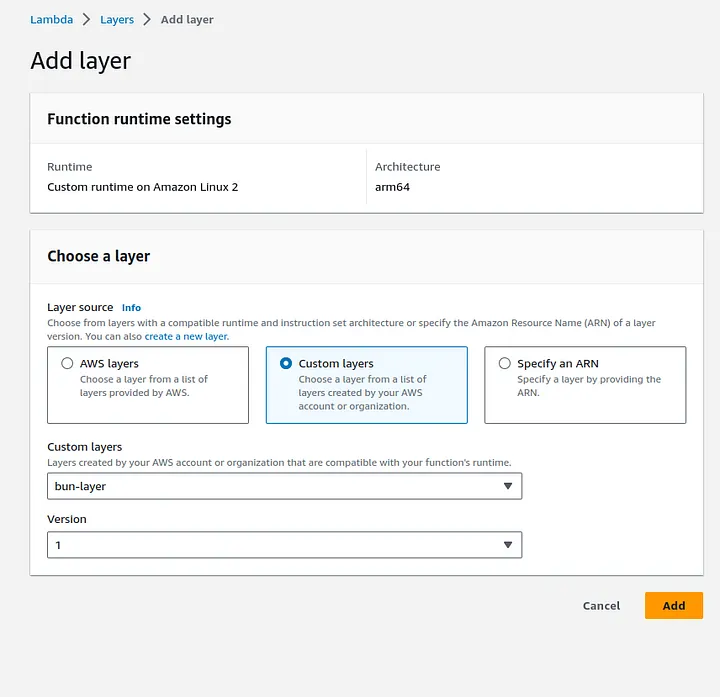
Now when you scroll down to the bottom you’ll see the Bun layer attached at the Layers section.
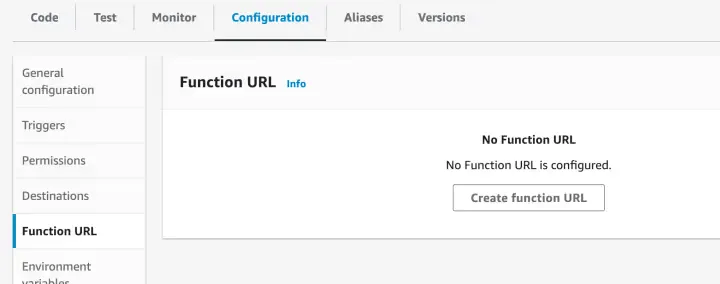
Step 9 — Enable Lambda Function URL
To test things out we can enable function URL for our Lambda.
- Go to Configuration tab, navigate to Function URL and click on Create function URL.
- Select NONE in Auth type which will make our AWS Lambda function publicly accessible by anyone via AWS Lambda function URL.
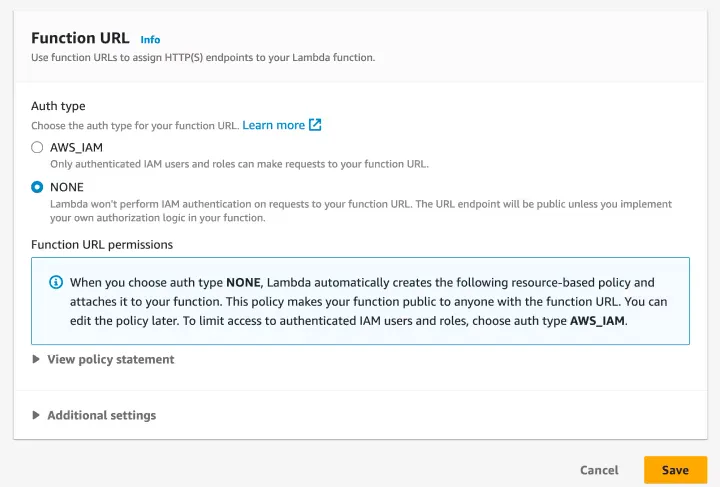
- Hit Save to deploy the changes.
Now you’ll see your AWS Lambda Function URL in Lambda Function overview page. After clicking the URL the “Hello CodeFactory” output should appear in your browser.
Step 10 — Check function logs in CloudWatch
Navigate to CloudWatch on your AWS console Select Log groups Search for your Lambda function name You should see the logs for the function calls:
Conclusion
There are many benchmark tests and comperisons on the web which shows that Bun can outperform Node and considering that it is a new technology (v1.0 is just a few days old) it definitely deserves attention. Personally I would say that Bun is easy to use, it’s speed is convincing, the widespread functionality provides a compact solution for developers and due to the constant updates it will evolve a lot in the near future.
Future Plans
Our next goal is to build an automated pipeline (both on GitHub and GitLab) to make things easier. We will also share our experiences and provide a step-by-step guide about it as well, so you can expect a new article soon.
Thank you for reading :)
Sources: bun-aws-lambda